Your Apple AirPods Pro 1st Gen are more than just earbuds; they're a gateway to your audio world, offering incredible noise cancellation and seamless integration with your Apple devices. But even the best tech has its moments of frustration. Whether you're battling connectivity dropouts, puzzling over battery drain, or just aiming to keep your investment performing optimally, mastering your first-generation AirPods Pro requires a bit of savvy.
This comprehensive guide is designed to transform you from a perplexed user into an AirPods Pro pro. We'll walk through common troubleshooting steps, unveil smart tips for everyday use, and share crucial maintenance advice to extend their life and ensure a premium listening experience.
At a Glance: Your AirPods Pro 1st Gen Survival Guide
- Quick Fixes First: Most issues (connectivity, sound) can often be resolved with a simple reset, a Bluetooth toggle, or a thorough cleaning.
- Battery Know-How: Understand your expected battery life and how to accurately check its status and health. Calibration can sometimes revive a flagging battery.
- Sound & Fit: The Ear Tip Fit Test is your secret weapon for optimal audio and noise cancellation. Clean ear tips and meshes are crucial for clear sound.
- Stay Updated: Always ensure your AirPods Pro firmware and your connected device's OS are up to date to prevent software glitches.
- Cleanliness is Key: Regular, gentle cleaning of your earbuds and charging case prevents a host of problems, from charging failures to muffled sound.
- Know Your Protections: Understand what the IPX4 rating means for water resistance and consider AppleCare+ for peace of mind against accidental damage or loss.
Understanding Your AirPods Pro: The Foundation
Before we dive into problem-solving, a quick refresher on what makes your 1st Gen AirPods Pro tick. Released in October 2019, these earbuds set a new standard with their active noise cancellation (ANC), transparency mode, and adaptive fit.
At their core is the H1 chip, Apple's custom silicon that powers "Hey Siri," ensures stable connections, improves battery efficiency, and enables that magical seamless device switching. It's also the muscle behind the sophisticated real-time sound processing for ANC and Transparency mode.
- Active Noise Cancellation (ANC): This feature uses both outward-facing and inward-facing microphones to detect external sounds and internal sounds (like your ear canal's acoustics). It then generates "anti-noise" to cancel them out, creating a remarkably quiet listening environment.
- Transparency Mode: The opposite of ANC, this mode intelligently mixes external sounds with your audio, allowing you to stay aware of your surroundings—perfect for quick conversations or navigating busy streets.
- IPX4 Rating: Your AirPods Pro are sweat and water-resistant, meaning they can handle splashes and vigorous workouts. However, they are not waterproof; avoid submerging them.
Knowing these fundamentals helps contextualize many of the issues you might encounter and the solutions we'll explore.
Solving Common AirPods Pro Headaches
Let's tackle the everyday frustrations head-on. Most problems have surprisingly simple solutions.
Connectivity Glitches: When Your AirPods Won't Connect
The dreaded "no connection" or intermittent audio dropouts can be incredibly annoying. Here's your playbook:
- Toggle Bluetooth: The classic IT advice: turn it off, then on again. On your iPhone, go to Settings > Bluetooth, toggle it off, wait a few seconds, then toggle it back on.
- Forget and Reconnect:
- Place your AirPods Pro in their charging case, and close the lid for 30 seconds.
- Open the lid, keeping the case near your iPhone.
- On your iPhone, go to Settings > Bluetooth, tap the "i" icon next to your AirPods Pro, and select "Forget This Device." Confirm your choice.
- With the AirPods Pro case lid open and near your iPhone, press and hold the setup button on the back of the case until the status light flashes amber, then white.
- A prompt should appear on your iPhone to reconnect. Follow the on-screen instructions.
- Reset Network Settings (iPhone): Sometimes, network conflicts on your iPhone can interfere. Go to Settings > General > Transfer or Reset iPhone > Reset > Reset Network Settings. Be aware this will clear all saved Wi-Fi passwords and cellular settings, so you'll need to re-enter them. After the reset, reconnect your AirPods Pro.
- Check for Interference: Wi-Fi routers, microwave ovens, and other Bluetooth devices can sometimes cause signal disruptions. Try moving away from these potential interference sources to see if performance improves.
Battery Drain & Health Concerns: Keeping Your Power Up
Battery issues can range from simply not charging to a noticeable drop in overall playback time.
- Check Battery Status Accurately:
- Pop-up: Open your AirPods Pro case lid near your unlocked iPhone. A pop-up will show the charge level for each AirPod and the case.
- Batteries Widget: Add the Batteries widget to your iPhone's Lock Screen or Home Screen for a quick glance.
- Ask Siri: "Hey Siri, what is the battery of my AirPods?"
- Calibrate Your Battery: This old trick can sometimes help your device's software get a more accurate reading of the battery's true capacity.
- Use your AirPods Pro until they (and the case) are completely drained and turn off.
- Charge both the AirPods Pro and the case fully, to 100%.
- Repeat this full drain and full charge cycle one or two more times.
- Assess Battery Health: For a more technical look, go to iPhone Settings > Bluetooth > tap the "i" icon next to your AirPods Pro > Battery Health. This will show you the maximum capacity relative to when they were new.
- Actionable Insight: If your battery health is significantly degraded (e.g., below 80%), you'll notice a considerable reduction in listening time. This is a normal part of battery aging. At this point, you might consider battery replacement through Apple Support, or upgrading if the cost isn't worth it for you.
- Optimize Usage: Active Noise Cancellation consumes more power than Transparency Mode or Off mode. If you need maximum battery life, consider switching modes when ANC isn't essential.
Sound Quality Woes: Muffled Audio or Weak Bass
Poor sound can ruin the experience. Often, the culprit is debris or an improper fit.
- The Ear Tip Fit Test: Your Best Friend: This built-in feature is crucial for both optimal sound and noise cancellation.
- Connect your AirPods Pro to your iPhone.
- Go to Settings > Bluetooth > tap the "i" icon next to your AirPods Pro.
- Tap "Ear Tip Fit Test."
- The test will play a short audio snippet and tell you if you have a "Good Seal" or suggest "Adjust" or "Try a different ear tip."
- Why it matters: A proper seal is essential for effective noise cancellation and robust bass response. Without it, sound leaks, and ANC can't work effectively.
- Clean, Clean, Clean: This is hands-down the most common solution for sound issues. Earwax and debris can easily clog the speaker meshes.
- Exterior: Gently wipe the exterior of each AirPod Pro and the charging case with a soft, dry, lint-free cloth.
- Speaker Mesh: For the tiny speaker meshes, use a dry cotton swab. You can also use a soft, clean, dry toothbrush (never damp) to very gently brush away debris. Avoid sharp objects, liquids, or abrasive materials.
- Microphones: Ensure the small microphone openings are also clear of debris.
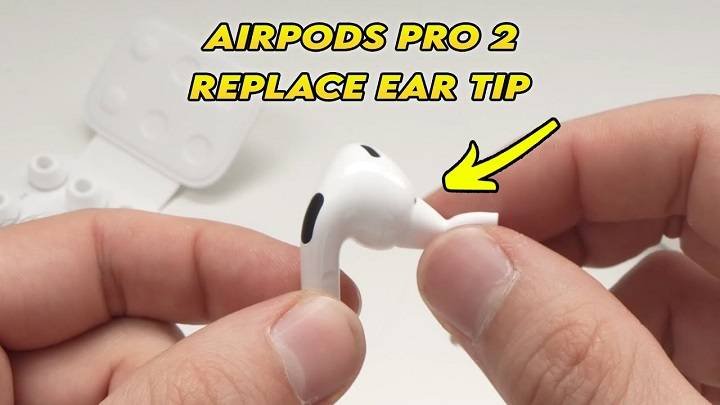
- Change Ear Tips: Your AirPods Pro come with Small, Medium, and Large silicone ear tips. If the fit test suggests it, or if you simply feel discomfort, try a different size.
- How to change: Gently pull off the current ear tip. To attach a new one, align the oval plastic ring on the ear tip with the oval-shaped speaker grill on the AirPod Pro, then push firmly until it clicks into place.
- Pro Tip: Some users find third-party memory foam ear tips offer an even better seal and comfort, which can further enhance ANC and bass.
- Adjust Audio Settings:
- Volume: Obvious, but worth checking.
- Audio Balance: If sound seems louder in one earbud, go to Settings > Accessibility > Audio/Visual and check the balance slider. It should be centered.
- Noise Control Toggle: Sometimes toggling between ANC, Transparency, and Off can resolve a temporary sound glitch.
Microphone Muffles: When Your Voice Isn't Heard Clearly
If people complain they can't hear you during calls, your microphone might be having trouble.
- Check Microphone Settings:
- On your iPhone, go to Settings > Bluetooth > tap the "i" icon next to your AirPods Pro.
- Tap "Microphone." Ensure it's set to "Automatically Switch AirPods." This allows the AirPods to intelligently pick the best microphone (either the left or right AirPod) for your call. If it's locked to one AirPod, and that AirPod is experiencing an issue or low battery, your audio quality will suffer.
- Clean Microphones: Just like speaker meshes, the tiny microphone openings can get clogged with lint or earwax. Gently clean them with a dry cotton swab or a soft, dry brush.
- Reset AirPods Pro: As outlined in the connectivity section, a full reset can often clear up stubborn software-related microphone issues.
Charging Conundrums: Case Not Charging or AirPods Not Filling Up
A non-charging case or earbuds are useless. Here's what to check:
- Inspect Cables & Adapters:
- Examine your Lightning to USB-C charging cable for any fraying, bends, or damage. A damaged cable is a common culprit.
- Try a different charging cable.
- Try a different power adapter or a different USB port (e.g., on a computer).
- Clean Charging Contacts:
- Case: Remove your AirPods Pro. Use a soft, dry, lint-free cloth to gently wipe inside the charging case, focusing on the small metal charging contacts where the AirPods sit. A small, soft brush (like a new, dry toothbrush) can help dislodge stubborn dirt.
- AirPods: Similarly, gently wipe the metal charging contacts on the bottom of each AirPod Pro stem.
- Never use liquids or compressed air inside the charging case or on the AirPods, as this can cause damage.
- Check Case Status Light:
- When charging the case (with or without AirPods inside), an amber light means it's charging and has less than 75% battery. A green light means it's charging and has more than 75% battery.
- If no light appears, ensure the cable is fully inserted and the power source is working.
- Wireless Charging: The AirPods Pro charging case supports wireless charging. Ensure your wireless charging pad is working correctly and the case is positioned centrally on it. The status light on the case will indicate charging.
Software Snags & Firmware Fixes: Keeping Your Tech Current
Sometimes, the problem isn't physical but digital.
- Update AirPods Firmware: Apple regularly releases firmware updates for AirPods Pro to improve performance, add features, and fix bugs. These updates are usually installed automatically when your AirPods Pro are in their case, connected to power, and near your iPhone.
- How to check: Connect your AirPods to your iPhone. Go to iPhone Settings > General > About > AirPods. Look for the "Firmware Version." If an update is available, ensure your iPhone is connected to Wi-Fi, and your AirPods are charging near your iPhone. The update should happen automatically overnight or when idle.
- Reset to Factory Settings: This is a more drastic step than simply forgetting the device, as it completely wipes any custom settings and brings your AirPods Pro back to their original state.
- Place both AirPods Pro in their charging case and close the lid for 30 seconds.
- Open the lid.
- Press and hold the setup button on the back of the case for about 15 seconds. The status light will flash amber, then white.
- Once the light is white, release the button. Your AirPods Pro are now reset and ready to be reconnected to your devices.
The Case of the Missing AirPods Pro: Finding Your Lost Buds
Misplacing your tiny earbuds is all too easy. Apple's Find My feature is your best bet.
- Enable Find My: This must be set up before you lose them. On your iPhone, go to Settings > (Your Name) > Find My > Ensure "Find My iPhone" is ON. Your AirPods Pro should then automatically be linked to this.
- Verify Location Services: Go to iPhone Settings > Privacy & Security > Location Services > Ensure the toggle is green (ON).
- Locate Them:
- Open the "Find My" app on your iPhone.
- Go to the "Devices" tab.
- Select your AirPods Pro from the list.
- If they're nearby and connected, you can tap "Play Sound" to make them chirp. This is surprisingly effective for finding them under a couch cushion.
- If they're offline or out of range, the map will show their last known location. You can tap "Directions" to navigate there.
- Important Note: Find My can only locate the individual AirPods Pro earbuds, not the charging case alone. If only your case is missing, this feature won't help directly.
- Prevention is Key: Rename your AirPods Pro with your contact information (e.g., "John's AirPods Pro - Call 555-1234"). Go to Settings > Bluetooth > tap the "i" icon next to your AirPods Pro > Name. While not a locator, it might help a kind stranger return them.
Unwanted Interference: When Signals Collide
Wireless devices live in a busy world, and sometimes their signals clash.
- Avoid Signal Blockers: Keep your AirPods Pro away from common sources of electromagnetic interference. These include:
- Microwave ovens
- Wireless routers (especially older ones)
- Cordless phones
- Other Bluetooth devices (especially older ones)
- Wireless cameras
- If you're experiencing consistent dropouts in a particular area, try moving away from these devices.
- Change Router Wireless Channel: If your Wi-Fi router is on the same 2.4 GHz frequency as Bluetooth, it can sometimes cause interference. You can access your router's settings (usually via a web browser) and try changing its wireless channel to 1, 6, or 11. These are non-overlapping channels and can sometimes improve stability. Save changes and restart your router.
Mastering Your AirPods Pro: Tips & Tricks for Everyday Use
Beyond troubleshooting, there's a world of features to optimize your AirPods Pro experience.
Everyday Controls & Customization
The Force Sensor on the stem of each AirPod Pro is your primary control hub.
- Single Squeeze: Play/pause music, answer/hang up calls.
- Double Squeeze: Skip forward to the next track. (Hold to fast forward).
- Triple Squeeze: Skip back to the previous track. (Hold to rewind).
- Squeeze and Hold: Toggle between Active Noise Cancellation and Transparency Mode.
- Customize Force Sensor Duration: If you find the multi-tap controls too fast or too slow, you can adjust them. Go to iPhone Settings > Accessibility > AirPods. Here you can tweak "Press Speed" for multi-taps and "Press and Hold Duration" for noise control.
- ANC with One AirPod: By default, ANC requires both AirPods. But if you only use one, you can enable ANC for that single bud. Go to Settings > Accessibility > AirPods > Enable "Noise Cancellation with One AirPod."
- Live Listen: Use your iPhone as a directional microphone to amplify sounds directly to your AirPods Pro. This is great for hearing conversations in a noisy room or listening to a speaker from a distance.
- Add "Hearing" to your Control Center: Settings > Control Center > Customize Controls > Add "Hearing."
- Activate: Swipe down from the top-right of your iPhone screen to open Control Center, tap the ear icon, then tap "Live Listen" and select your AirPods Pro.
- Audio Sharing: Share your iPhone's audio with a second pair of AirPods (or compatible Beats headphones).
- Start playing audio.
- Open Control Center, tap the AirPlay icon (triangle with circles).
- Bring the second pair of AirPods (in their open case) near your iPhone.
- Tap "Share Audio" when prompted.
- Announce Calls/Texts with Siri: Have Siri tell you who's calling or read out incoming messages, so you don't have to pull out your phone.
- For calls: iPhone Settings > Phone > Announce Calls > Select "Headphones & Car" or "Headphones Only."
- For messages: iPhone Settings > Notifications > Announce Notifications (under Siri).
Seamless Multi-Device Use
The Apple ecosystem is designed for effortless transitions.
- Automatic Device Switching: If you're signed into the same Apple ID on all your devices (iPhone, iPad, Mac, Apple Watch), your AirPods Pro will automatically switch between them based on which device you're actively using for audio. (Requires iOS 14+, iPadOS 14+, macOS Big Sur+, watchOS 7+).
- Control on Apple Watch: From the Now Playing screen on your Apple Watch, tap the Audio Sharing icon (three circles), then select your AirPods Pro and choose your noise control mode (ANC, Transparency, Off).
- Use with Mac:
- Control Center: Click the Control Center icon in your Mac's menu bar, then click the AirPlay button next to Volume. You'll see your AirPods Pro; click the arrow next to them to select noise control modes.
- System Settings: Go to System Settings (or System Preferences on older macOS) > Bluetooth. Click "Options" next to your AirPods Pro for more detailed settings.
- Pair with Android or Other Devices: While you lose some Apple-specific features, your AirPods Pro can still function as standard Bluetooth headphones.
- Place your AirPods Pro in their case with the lid open.
- Press and hold the setup button on the back of the case for about 15 seconds until the status light flashes white.
- On your Android phone (or other device), go to Settings > Bluetooth > Pair New Device (or similar).
- Select your AirPods Pro from the list.
- What works: Audio playback, ANC, Transparency Mode, and Force Sensor controls (play/pause, skip, noise control).
- What doesn't work: "Hey Siri," battery level display, Ear Tip Fit Test, automatic device switching, Audio Sharing.
Replacements & AppleCare+: Protecting Your Investment
Accidents happen, and AirPods Pro aren't cheap to replace.
- AppleCare+ for Headphones: This extended warranty (typically $29 for 2 years) provides accidental damage coverage.
- Cost Savings: With AppleCare+, a broken AirPod Pro will incur a service fee (around $29 per incident), significantly less than the out-ofwarranty replacement cost (around $89 per AirPod).
- Lost AirPods: Unfortunately, AppleCare+ does not cover lost AirPods or charging cases. A lost single AirPod or charging case will still cost around $89 to replace (prices vary by region and current Apple policy).
- When to buy: You can purchase AppleCare+ within 60 days of your AirPods Pro purchase.
- Ordering Replacements: If you lose an AirPod, charging case, or need new ear tips, you can order replacements directly from Apple's support page. Log in with your Apple ID, search for "AirPods," and follow the prompts for "Lost or Missing AirPods."
Keeping Them Pristine: Essential Maintenance
Regular care is vital for prolonging the life and performance of your AirPods Pro.
The Art of Cleaning
Dirt and debris are the enemies of good sound and reliable charging.
- AirPods Pro Earbuds:
- Exterior: Use a soft, dry, lint-free cloth (like a microfiber cloth) to gently wipe the entire outer surface of each AirPod.
- Speaker Meshes: This is crucial. Use a dry cotton swab or a soft-bristled, clean, dry toothbrush to gently brush away any earwax or debris from the main speaker mesh (where sound comes out) and the small mesh on the stem (for the inward-facing microphone). Be very gentle; don't push anything into the mesh.
- Microphone Openings: Use the same dry cotton swab or brush to clear the tiny microphone openings.
- Charging Contacts: Gently wipe the metal contacts on the bottom of the AirPod stems with your dry cloth.
- Ear Tips: Remove the silicone ear tips and rinse them under clean water. Wipe them dry with a soft cloth before reattaching, ensuring they are completely dry to avoid moisture damage.
- What to avoid: Sharp objects, abrasive materials, liquids (other than rinsing ear tips), compressed air (it can force debris further in or damage internal components).
- Charging Case:
- Exterior: Wipe with a soft, dry, lint-free cloth.
- Interior & Charging Wells: Remove the AirPods. Use a dry cotton swab or a soft, dry brush to gently clean the inside of the charging wells and the metal charging contacts at the bottom.
- Lightning Port: If debris is in the Lightning charging port, very carefully use a dry, soft-bristled toothbrush to brush it out. Do not use metal objects or push hard.
Protecting Your Investment
A little preventative care goes a long way.
- Respect the IPX4 Rating: Remember, sweat and water-resistant means splashes, not submersion. Don't shower with them, swim with them, or expose them to strong jets of water. If they get wet, dry them thoroughly before placing them back in the charging case.
- Store Properly: When not in use, always keep your AirPods Pro in their charging case. This protects them from dust, debris, and physical damage, and ensures they're charging.
- Avoid Extreme Temperatures: Don't leave your AirPods Pro in direct sunlight in a hot car, or expose them to extreme cold, as this can degrade battery life.
Firmware Updates: The Silent Guardian
We touched on this in troubleshooting, but it bears repeating: keeping your AirPods Pro firmware updated is paramount. These updates aren't just for new features; they often include critical bug fixes, performance improvements, and battery optimizations. Make it a habit to periodically check your firmware version and ensure your AirPods Pro spend enough time connected to your iPhone and power to receive these updates automatically.
When All Else Fails: Reaching Out for Support
You've tried everything. You've reset, cleaned, updated, and consulted every tip in the book, but your AirPods Pro are still acting up. At this point, it's time to leverage Apple's official support channels.
- Apple Support App: Download the "Apple Support" app on your iPhone. It's an excellent resource for diagnosing issues and connecting with support.
- Apple Support Website: Visit support.apple.com. You can initiate a chat, schedule a call, or find an Apple Store or authorized service provider near you.
- Genius Bar Appointment: For hardware-related issues, making an appointment at an Apple Store Genius Bar is often the best course of action. They can run diagnostics and offer repair or replacement options.
Clearly describe the steps you've already taken, as this will help the support technician narrow down the potential causes more quickly.
Keep Your Music Playing, Your Calls Clear
Your AirPods Pro 1st Gen are sophisticated pieces of technology designed to enhance your daily life. By understanding their features, diligently troubleshooting common problems, adopting smart usage habits, and committing to regular, gentle maintenance, you can ensure they continue to deliver that premium audio experience for years to come. Don't let a minor glitch derail your day; armed with these tips, you're now equipped to tackle most challenges and keep your earbuds performing at their best.